
INSTRUCTIONS FOR THE INFORMATION SECURITY CHANGE TOOL
The change request tool is intended to serve as the primary tool for processing normal change requests related to an information security connection.
Specify the order delivery time, according to which the request is fulfilled. The requests are fulfilled according to the selected delivery time. 'Next business day' means that the request is fulfilled by 4:00 pm on the next business day. 'Timed' means that the change can be made at a desired point in time, however no sooner than after at least two weekdays. 'Express' means that the request is fulfilled within two hours of being submitted. '8h (24/7)' means that the request is fulfilled within eight hours from being submitted. * marked fields are mandatory fields
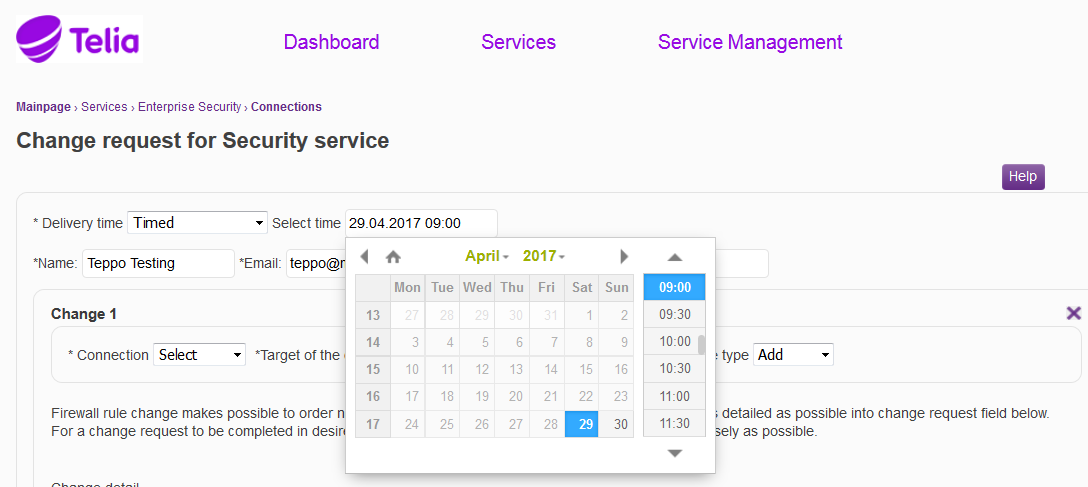
Figure: Specifying the delivery time
The requesters details are specified in the Name, Email and Phone fileds, and they are received automatically from the user details. These details can be changed, if information on the change is to be delivered to another person than the requester.
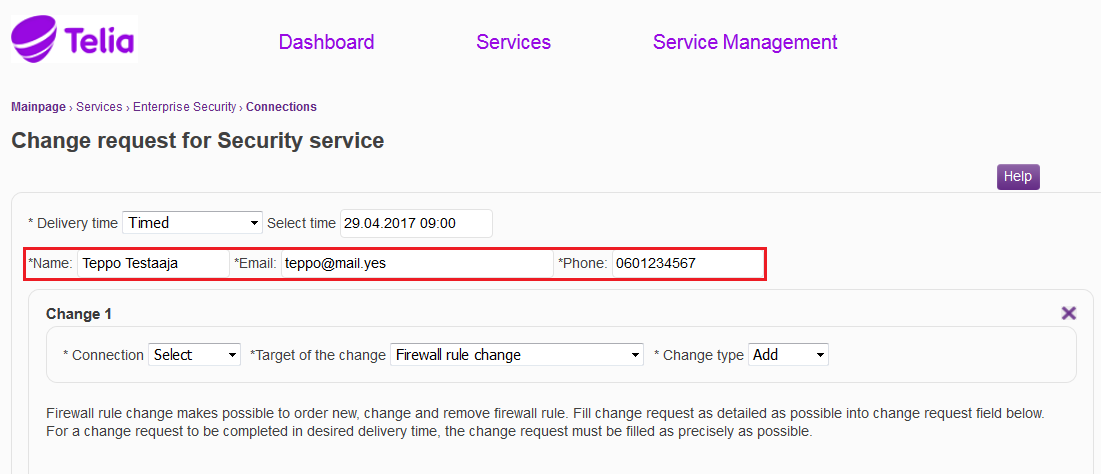
Figure: Specifying the requester's details
The connection to which the change is to be made is specified in the 'Connection menu. The service to which the change is to be made is selected in the Target of the change menu. The Target of the change menu shows only the services specified for the information security connection in question. All change targets of the connection are not shown with all delivery methods, e.g. a LAN-TO-LAN VPN order is not available as an express order. There are separate instructions for the change targets. In the Change type menu it is specified whether the request relates to an addition, change or deletion. The firewall rules can be seen if Rule base is selected.
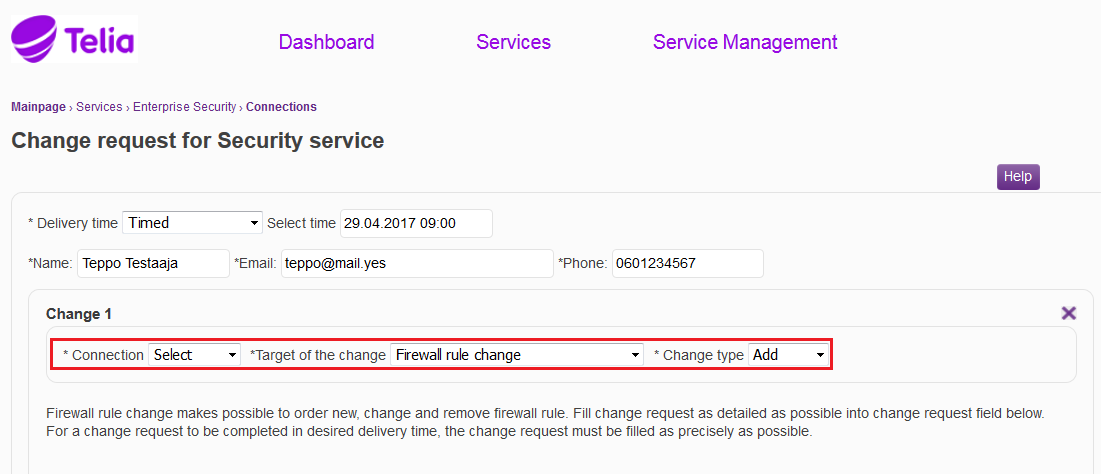
Figure: Specifying the connection, the target of the change, and the change type
In the 'Change details field, the change requested is specified. The obligatory information required in order for the request to be fulfilled is requested in the Change details field. The obligatory information on the target of the change is pre-filled in the Change details field. Filling in this information ensures that the request can be fulfilled. If information is missing from the Change details field, our specialist has to take actions to look for it. If the order is defective, we cannot guarantee that the delivery takes place within the estimated delivery time.
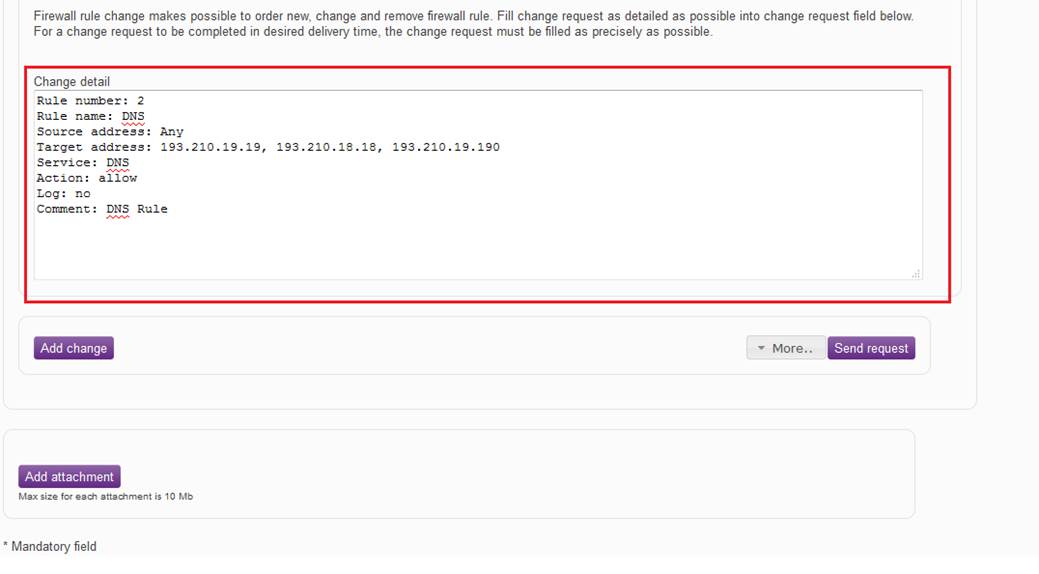
Figure: Specifying the change
After the change has been specified, it is possible to add changes to the request by clicking "Add change". The request can be submitted by clicking Send request. Under Add, select Save request or Cancel request. Under Add, it is also possible to cancel a request that has already been sent, if the processing of the request has not yet been started by selecting Return request. Attachments can be added to the request by clicking Add attachments.
Figure: Adding changes, sending the request, adding attachments, and specifying other functions
When the request has been fulfilled, the user specified in the request receives an acknowledgement to this end by email. Telia can return the request if more information is required and Telia has been unable to reach the requester by phone. A notification is also sent to the requesters email on a returned request.
Different change targets can be found in the table, and if you select a target, you can see a more detailed general description of the service, the issues to be specified and the order instructions.
3 Network address
translation (NAT)
7 Application and
bandwidth control
1 FIREWALL RULE CHANGE
Firewall rules filter traffic between two data communications networks, for example the companys LAN or subscriber line and the Internet, as specified in the firewall rules.
With firewall rule changes, you can request new rules, changes to the existing rules and their deletion.
1.1 Rule request
In the following, you will find a picture of a firewall rule base and descriptions of the settings to be ordered by a firewall rule request.
![]()
Figure: Firewall rule.
Specifying the rule number (No.)
The rule number specifies the point in the rule base where the rule is read. The firewall checks the rule base against the connection details in sequential order and stops when it finds a match. For this reason, the rule numbers are important.
Specifying the rule name
Give a name to the rule. The name will remain unchanged in the rule base. The name can include up to 30 characters.
Specifying the source
Specify the source address or addresses used. The source address can be an individual IP address, an IP network address, an object group including several IP addresses, IP networks or groups, and users or user groups or devices or device groups obtained from a user directory.
Specifying the destination
Specifying the service
The TCP/UDP port(s), service(s) and group(s) to be used are specified in the service.
Specifying the action
The following options are available when the action is specified:
· Accept, i.e. accept the traffic.
· Reject, i.e. reject the traffic. This differs from Drop in that the firewall informs the party attempting to establish a connection about the disconnection.
· Drop, i.e. drop traffic.
Specifying the rule log
Specify whether the rule in question is to be tracked.
Specifying the time of validity of the rule (Time)
Specify when the rule is valid. If the time is not specified, the rule is always valid. Here you can specify, for example, that the rule is valid only on weekdays. The available options are:
When the rule is activated or when the rule expires. E.g. activated 31-1-2015-08:00 and expires 31-12-2015-16:00.
The validity of the rule is restricted to a certain period of time or certain weekdays or certain days of the month. E.g. the rule is valid 08:00-16:00 Monday-Friday.
The comment is a free text attached to a rule.
Requesting a rule and sending it to implementation
When you have made the specifications, select Send request or, to add new changes, select Add change. When all the necessary specifications have been made, press Send request, and the request is submitted to Telia for implementation.
Example of a rule request
Rule number: 1
Rule name: Internet traffic
Source address: Intra_1.1.1.0m0
Destination address: Any
Service: http, https
Action: Accept
Log: No
Comment: Internet traffic of the organization
1.2
Rule
change request
Specify the rule to be changed and the change to be made. A rule change request should include the name of the rule or at least the number of the rule to be changed.
Example of a change request
Rule number: 1
Rule name: Internet traffic
Change to be made: Add the network Intra_1.1.2.0m0 to the source addresses.
1.3
Rule
deletion request
Specify the rule to be deleted. A rule deletion request should include the name of the rule to be deleted or at least the rule number.
Example of a deletion request
Rule to be deleted: Number: 1
Name of the rule to be deleted: Internet traffic
Return change targets table
2 OBJECT CHANGE
Objects are used when the rule base of an information security device is specified. The object can be an address, network, user, group, user group, service or service group.
With a firewall object change, you can order new objects, changes to existing objects and their deletion.
Each new object must be given a name containing up to 50 characters. The name should preferably disclose the type, context and content of the object. In addition, further information on each new object can be provided in the Comment field. The comment can contain up to 80 characters.
The objects that can be modified are described below:
Host
A host object contains a single IP address. The address (IP address, e.g. 192.168.1.1) or 2001:db8:85a3::8a2e:370:7334 for IPv6.
Figure: Host object
Network
A network object includes an entire network with masks. Address (IP address, e.g. 192.168.1.0 or 2001:db8:85a3::8a2e:370:7334 for IPv6). Mask (network mask, e.g. 255.255.255.0 or 120 for IPv6).
Figure: Network object
IP Range
An IP range object includes a range of IP addresses, e.g.192.168.1.1 192.168.1.10 or 2001:db8:85a3::8a2e:370:7334 2001:db8:85a3::8a2e:370:7340 for IPv6.
Figure: IP range object
Service
A service object includes the protocol and the port. Protocol, e.g.TCP/IP, UDP, http. Port, e.g. tcp888.
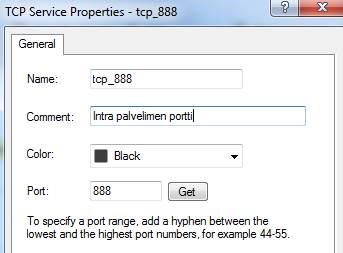
Figure: Service object
Object and service group
An object and service group includes a number of other objects. Thus, an object group may contain hosts, networks, IP ranges and object groups. An object group can only include objects of the same IP version.
E.g. a group including IP addresses, Intra_verkot, includes the objects yritys_10.10.10.10 and yritys_10.10.20.0m0.
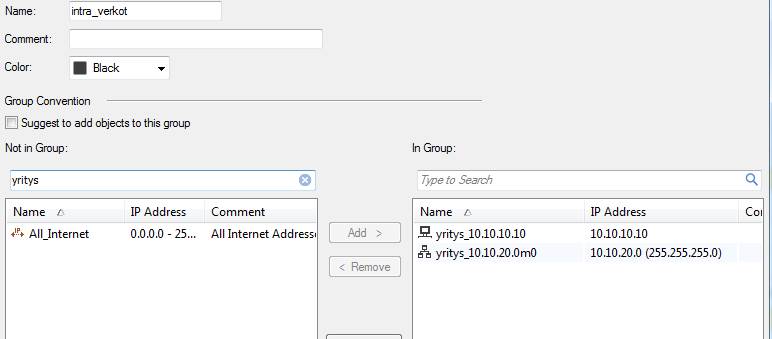
Figure: Group object
A service group can include services and service groups. E.g. A group including service groups, Intra_Palvelimen_portit, includes the ports tcp 400402 and tcp 8001.
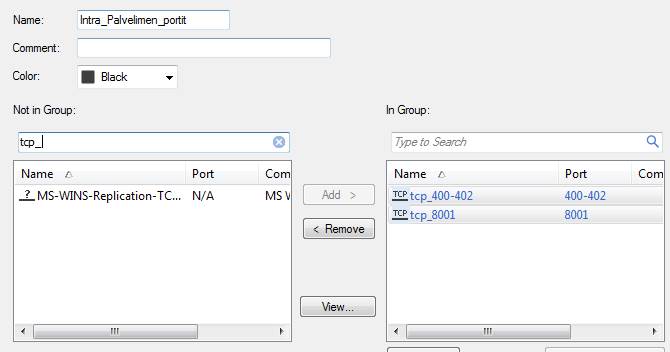
Figure: Service group object
2.1 Object request
Specifying the object type
Specify whether a host, user, network, service or group object is concerned.
Specifying the object name
Give a name to the object. The name can contain up to 50 characters.
Specifying the object content
Specify what the object includes (IP addresses, networks, etc.).
Specifying the object comment
Enter a comment on the object, if necessary.
Object request and sending it to implementation
When you have made the specifications, select Send request or, to add new changes, select Add change. When all the necessary specifications have been made, press Send request, and the request is submitted to Telia for implementation.
Example of a request for a new object
Specifying the object type: Host object;
Specifying the object name: Intra_1.1.1.1
Specifying the object content: 1.1.1.1
Specifying the object comment: Intranet server
2.2 Object change request
Specify which object is to be changed (name) and the change to be made.
Example of an object change request
Name of the object to be changed: Intra_1.1.1.1
New name to be entered for the object: Intra_1.1.1.3
New content to be entered for the object: 1.1.1.3
New comment to be entered for the object: to remain unchanged
2.3 Object deletion request
Specify the object to be deleted (name). NB: The object in question will then be deleted from the information security connection and, if it is used as the only object in the rule, it will be replaced by the object 'Any.
Example of an object deletion request
Name of the object to be deleted: Intra_1.1.1.1
Return change targets table
3 NETWORK ADDRESS TRANSLATION (NAT)
NAT (network address translation) rules specify which addresses or services are to be translated into which addresses or services. The rules are similar to those used in a standard rule base to specify the traffic to be allowed or blocked.
The original source and destination address and service must be specified. If the traffic meets these criteria, the changes specified in the following fields will be carried out, i.e. it determines whether the used source or destination address or service is translated or not.
A NAT request can be used to order new network address translations, changes to them or their deletion.
3.1 Network address translation rule request
In the following, you will find a picture of a NAT rule and descriptions of the settings ordered with a NAT request.
![]()
Figure: NAT rule
Specifying the rule number (No.)
The rule number defines the point in the rule base where the rule is read. The information security device checks the rule base against the connection details in sequential order and stops when it finds a match. For this reason, the rule numbers are important.
Specifying the original packet source
Specify the original source address used. It can be an individual IP address, an IP network, or an object group including several IP addresses, IP networks or groups.
Specifying the original packet destination
Specify the original destination address used. It can be an individual IP address, an IP network or an object group including several IP addresses, networks or groups.
Specifying the original packet service
The TCP/UDP port, service or group to be used are specified in the service.
Specifying the translated packet source
Specify the translated source address. It can be an individual IP address, an IP network, or an object group including several IP addresses, IP networks or groups.
Specifying the translated packet destination
Specify the translated destination address. It can be an individual IP address, an IP network or an object group including several IP addresses, networks or groups.
Specifying the translated packet service
Specify the translated TCP/UDP port or service.
Specifying a Comment
The comment is a free text attached to a rule.
Saving a rule and sending a request for implementation
When you have made the specifications, select Send request or, to add new changes, select Add change. When all the necessary specifications have been made, press Send request, and the request is submitted to Telia for implementation.
Example of a rule request, translation of single network address
Rule number: 1
Original source address: Yritys_10.10.10.10
Original destination address: Any
Original service: Any
Translated source address: Yritys_172.2.1.1
Translated destination address: Any
Translated service: Any
Comment: Translation of the address of the intranet server
Example of a rule request, translation of several network addresses to a single address (Hide-nat)
Rule number: 1
Original source address: Yritys_10.10.10.0m0
Original destination address: Any
Original service: Any
Translated source address: Yritys_172.2.1.1
Translated destination address: Any
Translated service: Any
Comment: Intranet address translation.
3.2 Network address translation rule change request
Specify the rule to be changed and the change to be made.
Example of a change request
Rule number: 1
Change to be made: Replace the original source address by the network Yritys_10.10.11.0m0
3.3 Network address translation rule deletion request
Specify the NAT rule to be deleted.
Example of a deletion request
Rule to be deleted: Number: 1
Original source address: Yritys_10.10.10.10
Original destination address: Any
Original service: Any
Translated source address: Yritys_172.2.1.1
Translated destination address: Any
Translated service: Any
Comment: Translation of the address of the intranet server
Return change targets table
4 LAN-TO-LAN VPN
The VPN functionality allows strongly encrypted IPSec VPN connections to be set up between the customers offices or the customers partners.
With a VPN change request, you can order new VPN connections or changes to existing VPN connections or their removal. If the firewall supports IPv6 addresses, you can also specify a new IPv6 VPN. Different IP versions cannot be mixed in a VPN, but all addresses and objects must be of the same IP version. To allow the VPN connection to be implemented, a VPN change request must include the following information:
· General VPN details, such as the requested delivery time and the details of the other party. LAN-to-LAN change request information will be send to other party technical contact person by email
· VPN parameters
· Internal and external IP addresses, i.e. the networks that operate on the VPN connection and the traffic of which is encrypted
· Further details concerning the order, such as the services/ports to be activated for the connection.
4.1 LAN-to-LAN VPN connection request
Specifying the general details
Specify the details of the other party of the VPN connection in the general details. This information is needed when the VPN connection is specified. The necessary details include the following:
· Company name (if external company)
· Technical contact person who makes the configuration at the other end
· E-mail address of the technical contact person
· Mobile phone number of the technical contact person (a pre-shared secret password is sent to this number).
Specifying the VPN parameters
· Name of the VPN connection:
· STARTING POINT OF VPN CONNECTION (enter the default interface here):
· END POINT OF VPN CONNECTION:
· Mode. The options are Main and Aggressive. Main refers to normal negotiation complying with the IPSEC standard in the setting up of the connection, while Aggressive overrides certain phases to speed up the negotiation.
· Phase1 Diffie-Hellman group. This protocol protects the PKI key exchange.
· Phase1 Encryption Algorithm. Phase 1 encryption algorithm for encrypting a phase 2 negotiation.
· Phase1 Hash Algorithm. Phase 1 Hash Algorithm (uses a secure hash) secures phase 2 negotiation integrity.
· Phase1 Lifetime seconds. The duration of phase 1 in seconds. Phase 1 is renegotiated (automatically) after the time is up.
· Phase2 Perfect Forward Secrecy. Improves data security in case someone finds out the PKI key of the VPN connection by means of wiretapping.
· Phase2 Lifetime seconds. The duration of phase 2 in seconds. Phase 2 is renegotiated (automatically) after the time is up.
· Phase2 ESP/AH. ESP (Encapsulated Security Payload) encrypts the package. AH (Authentication Header) only checks the integrity of the package.
· Phase2 Encryption Algorithm. Phase 2 encryption algorithm for traffic encryption.
· Phase2 Authentication Algorithm. Phase 2 Hash Algorithm (uses a secure hash) secures phase 2 traffic integrity.
NB: The VPN parameters between the VPN devices must be perfect matches, and all devices do not necessarily support all the options offered by the tool.
Specifying internal addresses
Specify those internal IP addresses with their network masks that will operate on the requested VPN connection.
The internal addresses specify which networks participate in the VPN connection. You can specify several networks. Firewall rules can be used for specifying in more detail the IP addresses that are allowed to operate within the VPN connection, and thus host definitions are not recommended.
Specifying external addresses
Specify those IP addresses with their network masks that will operate on the requested VPN connection from the other partys VPN device.
Specifying further information
Specify further information related to the request. It is recommended to also enter the VPN-connection-related openings, i.e. the protocols allowed for the connection. If necessary, the rules can also be ordered separately with a firewall change request.
Sending a request for implementation
When you have made the specifications, select Send request or, to add new changes, select Add change. When all the necessary specifications have been made, press Send request, and the request is submitted to Telia for implementation.
Example of a VPN change request
Contact details of the other party of the VPN connection
Company name: Company Ltd
Name of the technical contact person: Ted Tester
E-mail address of the technical contact person: ted.tester@company.fi
Mobile phone number of the technical contact person: 0401234567
Specifying the parameters of the VPN connection
Name of the VPN connection: VPN-to-Partner
Starting point of VPN connection: 192.168.1.1
End point of VPN connection: 192.168.2.1
Mode (default main): main
Phase1 Diffie-Hellman group (default group2): group2
Phase1 Encryption Algorithm (default aes256): aes256
Phase1 Hash Algorithm (default sha-1): sha1
Phase1 Lifetime seconds (default 28000): 28000
Phase2 Perfect Forward Secrecy (default no-pfs): no-pfs
Phase2 Lifetime seconds (default 3600): 3600
Phase2 ESP/AH (default esp): esp
Phase2 Encryption Algorithm (default aes256): aes256
Phase2 Authentication Algorithm (default sha-1): sha1
Networks allowed on the VPN connection
Internal addresses: 10.10.10.0m0
External addresses: 20.20.20.0m0
Further details on the request: VPN-connection-related rules for the firewall at which all traffic is to be allowed
4.2 VPN connection change request
Specify the VPN connection to be changed and the change to be made.
Example of a change request
Name of the VPN connection: VPN-to-Partner
Change to be made: Adding the network 10.10.20.0m0 as the internal address.
4.3 VPN connection deletion request
Specify the VPN connection to be deleted.
Example of a deletion request
Delete the following VPN connection.
Name of the VPN connection: VPN-to-Partner
Return change targets table
5 ROUTING/ANTISPOOFING CHANGE
Dynamic routing (BGP) is used for the security device routing at the network interfaces of the internal network. The routing information is thus received at the security device, but a so-called antispoofing feature is activated on the device to check that there are only known networks at the network interfaces of the security device. For this reason, the networks advertised at the network interfaces of the internal network must always be added to the configuration of the security device.
With a routing/antispoofing change request, you can order new internal networks to be added to the security device, changes to the existing ones or their deletion.
5.1 Routing request
Specifying the IP version
Specify the used IP version.
Specifying the IP address and mask
Specify the IP network address and mask of the internal network.
Specifying the network interface to be routed
Specify the network interface of the internal network where the network is advertised.
Sending a request for implementation
When you have made the specifications, select Send request or, to add new changes, select Add change. When all the necessary specifications have been made, press Send request, and the request is submitted to Telia for implementation.
Example of a routing/antispoofing request
The network address and mask to be routed: 10.10.10.0m0
Network interface of the route: eth1
5.2 Routing change request
Specify the route to be changed and the change to be made.
Example of a change request
The network address and mask to be routed: 10.10.10.0m0
Network interface of the route: eth1
Change to be made: Change the network interface of the route to eth2.
5.3 Routing deletion request
Specify the route to be deleted.
Example of a deletion request
Delete the following routing:
The network address and mask to be routed: 10.10.10.0m0
Network interface of the route: eth1
Return change targets table
6 WEB FILTERING
With a web filtering request, you can order new rules and user messages to the web content filtering service, changes to them and their deletion.
In web content filtering, the URL (Uniform Resource Locator) of a downloaded Internet page is compared with a database where web pages are pre-categorized into certain page categories. This functionality allows users to be informed in real time of web traffic restrictions, the risks of the Internet, and the information security policy of the organization.
Changes can be made to the scanned networks or users, destination addresses, category, functionality, user message, tracking, validity of the rule, and frequency band restriction.
6.1 Web filtering rule request
In the following, you will find a picture of the default rule for web filtering, which is activated when the service is introduced, and descriptions of the settings that are ordered with a web content filtering request.
Figure: Web content filtering rule.
Specifying the rule number (No.)
The rule number defines the point in the rule base of web filtering where the rule is read.
Specifying the rule name
Give a name to the rule. The name will remain unchanged in the rule base. The name can include up to 30 characters.
Specifying the source field
Specify the source address to be used. It can be an individual IP address, an IP network, a user / user group or an object group including several IP addresses, IP networks, users or groups.
Specifying the destination field
Specify the destination address used. It can be an individual IP address, an IP network or an object group including several IP addresses, networks or groups.
Specifying the web content filtering category (Applications/Site)
Specify the category used. To view the categories, select AppWiki in the GUI client. The categories are shown in the Tags field (NB: some of the categories scan only applications, not URLs).
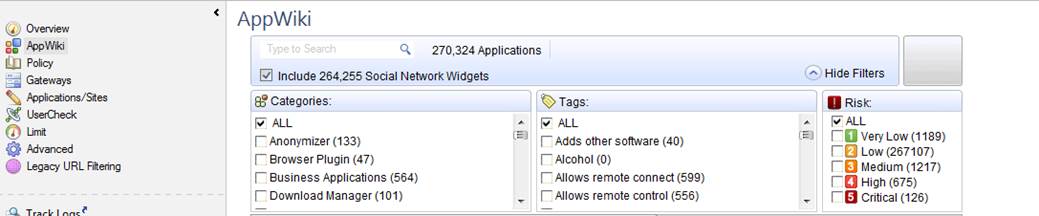
Figure: The AppWiki view and the categories
Specifying the action (Action)
The following options are available when the action is specified:
· Block the traffic: A user can be notified of traffic blocking by means of a user message. The user message specifying here.
· Allow the traffic: The frequency band of the traffic to be allowed can also be limited (Limit).
· Inform: This means that the traffic is allowed, but the user is informed of the terms and conditions of use. The user message is specified separately. If necessary, it is possible to specify how often the user message is shown to the user (once a day, once a week, once a month; the shortest interval available is once an hour). The frequency band of the traffic can also be limited (Limit).
· Ask: This means that the traffic is allowed, but the user is informed of the terms and conditions of use and requested to confirm the opening of the connection. The user message is specified separately. If necessary, it is possible to specify how often the user message is shown to the user (once a day, once a week, once a month; the shortest interval available is once an hour). The frequency band of the traffic can also be limited (Limit).
Specifying the tracking of the rule
Specify whether the rule in question is to be tracked.
Specifying the time of validity of the rule (Time)
Specify when the rule is valid. If the time is not specified, the rule is always valid. Here you can specify, for example, that the rule is valid only on weekdays. The available options are:
When the rule is activated or when the rule expires. E.g. activated 31-1-2015-08:00 and expires 31-12-2015-16:00.
The validity of the rule is restricted to a certain period of time or certain weekdays or certain days of the month. E.g. the rule is valid 08:0016:00 MondayFriday.
Specifying a Comment
The comment is a free text attached to a rule.
Sending a request for implementation
When you have made the specifications, select Send request or, to add new changes, select Add change. When all the necessary definitions have been made, press Send request, and the request is submitted to Telia for implementation.
Example of a rule request
Rule number: 1
Rule name: Prohibited web pages
Source address: Any
Destination address: Any
Categories: Alcohol, weapons
Action: Block, User message: Blocked message
Log: Yes
Comment: Prohibited web pages
6.2 Web filtering rule change request
Specify the rule to be changed and the change to be made.
Example of a change request
Rule number: 1
Rule name: Prohibited web pages
Source address: Any
Destination address: Any
Categories: Alcohol, weapons
Action: Block, User message: Blocked message
Log: Yes
Comment: Prohibited web pages
Change to be made: Change the source network to intra_10.10.10.0m0
6.3 Web filtering rule deletion request
Specify the rule to be deleted.
Example of a deletion request
Number of the rule to be deleted: 1
Rule name: Prohibited web pages
6.4
Web filtering user message request
In the following, you will find a picture of a web filtering user message (Block) and how it is shown in the browser, and also descriptions of the settings that can be made in the fields.

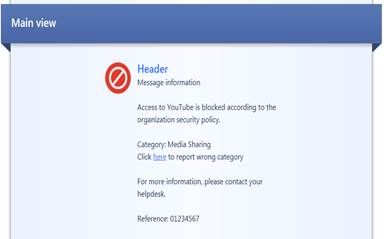
Figure: Specifying a user message.
Message type (Block/Inform/Ask)
The message can be a block, inform or ask message. A block message is sent, if the the traffic is not allowed. An inform message is sent to inform the user, who then selects either OK or Cancel. An ask message requests the user to confirm whether he or she approves the terms and conditions of use.
Message name
Give a name to the message.
Message comment
Specify a comment for the message. The comment is not shown in the user message.
User message main view
Specify the main view (main heading) to be shown on the top of the user message.
User message logo
Specify the logo to be shown in the user messages. Attach the logo to the request as an attachment file.
User message header
Specify a header for the user message information field.
User message information
Specify the contents of the user message.
Example of a user message request
Message type: Block
Message name: Blocked message
Message comment: Web content filtering Blocked message
User message main view: Web control
User message logo: Attached to the request
User message header: Web site blocked
User message information: Access to web-site is blocked according to the organization security policy. For more information, please contact your helpdesk.
6.5 Web filtering user message change request
Specify the user message to be changed and the change to be made.
Example of a change request
Message name: Blocked message
Message comment: Web content filtering Blocked message
User message main view: Web control
User message logo: Attached to the request
User message header: Web site blocked
User message information: Access to web-site is blocked according to the organization security policy. For more information, please contact your helpdesk.
Change to be made: Change the user message logo. The logo is in the file attached to the request.
6.6 Web filtering user message deletion request
Specify the user message to be deleted.
Example of a deletion request
Name of the message to be deleted: Blocked message
Return change targets table
7 APPLICATION AND BANDWIDTH CONTROL
With an application and bandwidth control request, you can order new rules and user messages to the application and bandwidth control service, changes to the existing ones and their deletion.
This functionality allows network use to be identified, allowed, prevented or limited application-specifically. Typical services to be identified are social media applications, video services and file sharing services. The technology identifies thousands of different applications and their sub-applications. This functionality allows users to be informed in real time of application use limitations, the risks of the Internet, and the information security policy of the organization.
Changes can be made to the scanned networks or users, destination addresses, applications, functionality, user message, tracking, validity of the rule, and frequency band restriction.
7.1 Application and bandwidth control rule request
In the following, you will find a picture of the default rule for application and bandwidth control, which is activated when the service is introduced, and descriptions of the settings ordered with an application and bandwidth control request.
![]()
Figure: Application and bandwidth control rule
Specifying the rule number (No.)
The rule number defines the point in the application and bandwidth control rule base where the rule is read.
Specifying the rule name
Give a name to the rule. The name will remain unchanged in the rule base. The name can include up to 30 characters.
Specifying the source
Specify the source address to be used. It can be an individual IP address, an IP network, a user / user group or an object group including several IP addresses, IP networks, users or groups.
Specifying the destination
Specify the destination address used. It can be an individual IP address, an IP network or an object group including several IP addresses, networks or groups.
Specifying the application category or application (Applications/Sites)
Specify the application or category used. You can view the applications, categories and risk classification by selecting AppWiki in the GUI client. To view all applications, select Include Social Network Widgets.
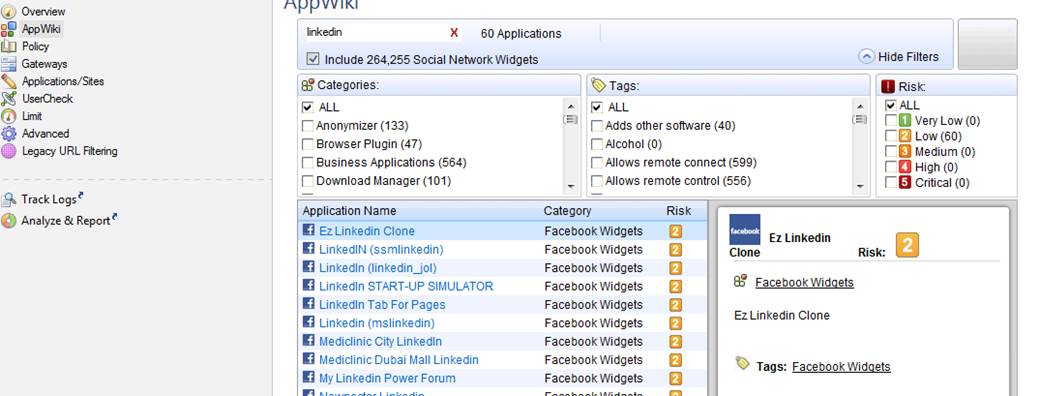
Figure: AppWiki display with linkedin as the search criterion
Specifying the action
The action is specified using one of the following options:
· Block the traffic: A user can be notified of traffic blocking by means of a user message. The user message specifying here.
· Allow the traffic: The frequency band of allowed traffic can also be limited (Limit).
· Inform: This means that the traffic is allowed, but the user is informed of the terms and conditions of use. The user message is specified separately. If necessary, it is possible to specify how often the user message is shown to the user (once a day, once a week, once a month; the shortest interval available is once an hour). The frequency band of the traffic can also be limited (Limit).
· Ask: This means that the traffic is allowed, but the user is informed of the terms and conditions of use and requested to confirm the opening of the connection. The user message is specified separately. If necessary, it is possible to specify how often the message is shown to the user (once a day, once a week, once a month; the shortest interval available is once an hour). The frequency band of the traffic can also be limited (Limit).
Specifying tracking of the rule
Specify whether the rule in question is to be tracked.
Specifying the time of validity of the rule (Time)
Specify when the rule is valid. If the time is not specified, the rule is always valid. Here you can specify, for example, that the rule is valid only on weekdays. The available options are:
When the rule is activated or when the rule expires. E.g. activated 31-1-2015-08:00 and expires 31-12-2015-16:00.
The validity of the rule is limited to a certain period of time or certain weekdays or certain days of the month. E.g. the rule is valid 08:00-16:00 Monday-Friday.
Specifying a Comment
The comment is a free text attached to a rule.
Saving a rule and sending a request for implementation
When you have made the specifications, select Send request or, to add new changes, select Add change. When all the necessary definitions have been made, press Send request, and the request is submitted to Telia for implementation.
Example of a rule request
Rule number: 1
Rule name: Forbidden applications
Source address: Any
Destination address: Any
Categories: Critical risk, P2P file sharing
Action: Block, User message: Blocked message
Log: Yes
Comment: Forbidden applications
7.2 Application and bandwidth control rule change
request
Specify the rule to be changed and the change to be made.
Example of a change request
Rule number: 1
Rule name: Forbidden applications
Source address: Any
Destination address: Any
Categories: Critical risk, P2P file sharing
Action: Block, User message: Blocked message
Log: Yes
Comment: Forbidden applications
Change to be made: Change the source network to intra_10.10.10.0m0
7.3 Application and bandwidth control rule deletion
request
Specify the rule to be deleted.
Example of a deletion request
Number of the rule to be deleted: 1
Rule name: Forbidden applications
7.4 Application and bandwidth control user message request
In the following, you will find a picture of the user message (Block) of application and bandwidth controö and how it is shown in the browser, and also descriptions of the settings that can be made in the fields.


Figure: User message
Message type (Block/Ask/Inform)
The message can be a block, inform or ask message. A block message is sent, if the traffic is not allowed. An inform message is sent to inform the user, who then selects either OK or Cancel. An ask message requests the user to confirm whether he or she approves the terms and conditions of use.
Message name
Give a name to the message.
Message comment
Specify a comment for the message. The comment is not shown in the user message.
User message main view
Specify the main view (main heading) to be shown on top of the user message.
User message logo
Specify the logo to be shown in the user messages. Attach the logo to the request as an attachment file.
User message header
Specify a header for the user message information field.
User message information
Specify the contents of the user message.
Example of a user message request
Message type: Block
Message name: Blocked message
Message comment: Application management blocked message
User message main view: Applications control
User message logo: Attached to the request
User message header: Applications blocked
User message information: Access to applications is blocked according to the organization security policy. For more information, please contact your helpdesk.
7.5 Application and bandwidth control user message
change request
Specify the user message to be changed and the change to be made.
Example of a change request
Message type: Block
Message name: Blocked message
Message comment: Application management blocked message
User message main view: Applications control
User message logo: Attached to the request
User message header: Applications blocked
User message information: Access to applications is blocked according to the organization security policy. For more information, please contact your helpdesk.
Change to be made: Change the user message logo. The logo is in the file attached to the request.
7.6 Application and bandwidth control user message
deletion request
Specify the user message to be deleted.
Example of a deletion request
Name of the user message to be deleted: Blocked message
Return change targets table
8 ANTIVIRUS SERVICE
The antivirus service scans the files downloaded through the firewall and prevents any malware from entering the customer network according to the companys scanning policy. The antivirus service supports the most common web browsing, data transmission and email protocols. The user is notified of any viruses detected. The firewall updates the virus database automatically from the manufacturers update servers. Typically there is no need to make any changes to the rule base and the profile, but the protection is sufficient if the default values are used.
With an antivirus request, you can order new rules, profiles and user messages for the anti-virus service and changes to them or their deletion.
Changes can be made to the networks scanned, to the scan profile in order to prevent, detect, enquire or deactivate scanning, or to the message shown to the user.
Profile scanning is based on the confidence level and performance settings that are specified by the manufacturer and that can be changed.
The protection settings are specified by the manufacture.

Figure: Antivirus protection settings specified by the manufacturer
8.1
Antivirus
rule request
In the following, you will find a picture of an antivirus rule and descriptions of the settings ordered with an antivirus rule request.
![]()
Figure: Antivirus rule
Definition of the rule number (No.)
The rule number defines the point in the anti-virus rule base where the rule is read.
Specifying the rule name (Name)
Give a name to the rule. The name will remain unchanged in the rule base. The name can include up to 30 characters.
Definition of the protected scope
Specify what IP addresses, IP networks or users are scanned (Any refers to all).
Definition of the profile (Action)
Specify the profile to be used in the rule. Instructions on how to specify the profile here.
Specifying the tracking of the rule
Specify whether the rule in question is to be tracked.
Specifying a Comment
The comment is a free text attached to a rule.
Sending a request for implementation
When you have made the specifications, select Send request or, to add new changes, select Add change. When all the necessary definitions have been made, press Send request, and the request is submitted to Telia for implementation.
Exampe of a rule request
Rule number: 1
Rule name: anti-virus scan
Protected scope: Any (scans all traffic)
Scan profile: Recommended_Profile
Track: Yes
Comment: Anti-virus scan of the organization.
8.2 Antivirus rule change request
Specify the rule to be changed and the change to be made.
Example of a change request
Rule name: Antivirus scan
Protected scope: Any (scans all traffic)
Scan profile: Recommended_Profile
Track: Yes
Comment: Antivirus scan of the organization
Change to be made: Change the protected scope to network intra_10.10.10.0m0
8.3 Antivirus rule deletion request
Specify the rule to be deleted.
Example of a deletion request
Rule to be deleted: Number 1
Name of the rule to be deleted (obligatory information): Anti-virus scan
8.4 Antivirus profile request
In the following, you will find a picture of a profile scan activated when the service is introduced and descriptions of the specifications that can be made in the fields.
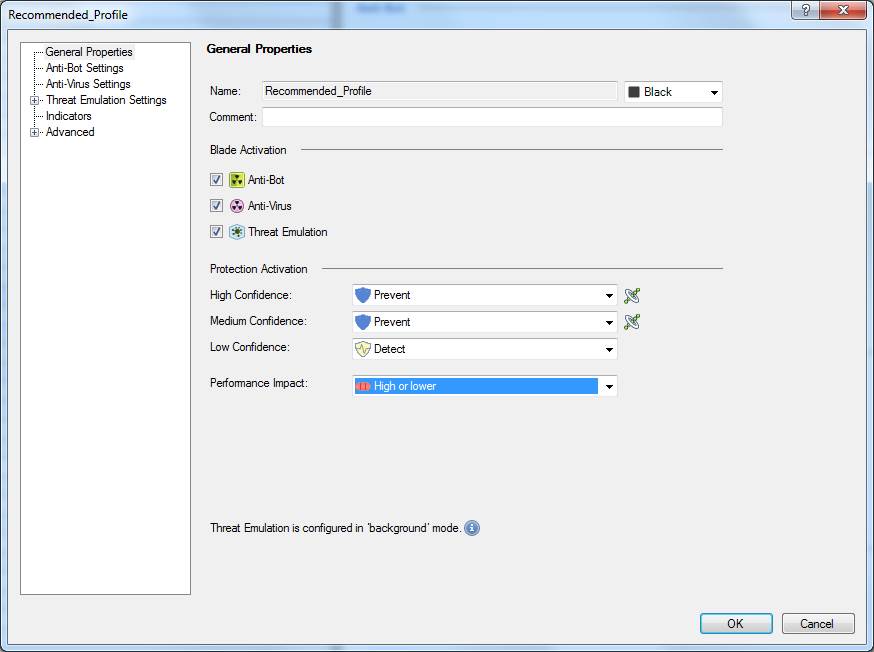
Figure: Profile specifications
NB: The antivirus profile can be identical with the Botnet protection and Advanced Threat Protection profile.
Specifying the profile name (Name)
Specify the profile name. The name can include up to 60 characters.
Specifying a Comment
Specify a comment for the profile. The comment can include up to 80 characters.
Specifying high-confidence actions
The confidence level determines how likely the detected virus is actually a virus. Specify the actions to be taken with high-confidence traffic. The options are: Prevent, Detect, Ask or Inactive. The user message sent to the user is determined by these settings. If Prevent is selected, a Block message is sent, and if Ask is selected, an Ask message is sent. The user message specifying here.
Specifying medium-confidence actions
Specify the actions to be taken with medium-confidence traffic. The options are: Prevent, Detect, Ask or Inactive.
Specifying low-confidence actions
Specify the actions to be taken with low-confidence traffic. The options are: Prevent, Detect, Ask or Inactive.
Performance Impact
Specify the performance level on or below which scanning is performed. The options are: Low, Medium or lower, High or lower.
8.5 Antivirus profile change request
Specify the profile to be changed and the change to be made.
Example of a change request
Profile name: Intra_verkon_suojaus
Comment: Profile for protecting the intranet
High-confidence actions: prevent
Medium-confidence actions: prevent
Low-confidence actions: detect
Impact on performance: High or lower
Change to be made: Change low-confidence actions to: prevent
8.6 Antivirus profile deletion request
Specify the profile to be deleted.
Example of a deletion request
Profile to be deleted: Intra_verkon_suojaus
8.7 Antivirus user message request
In the following, you will find a picture of an antivirus user message (Prevent) and how it is shown in the browser and also a list of the settings ordered with an anti-virus user message request.

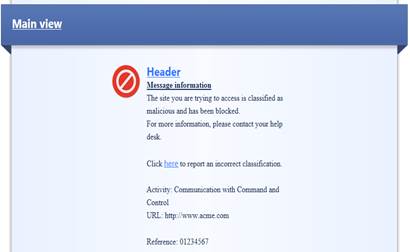
Figure: User message.
Message type (Block/Ask)
The message can be a block or an ask message. A block message is sent if the setting Prevent is selected in the profile. An ask message is sent if the setting Ask is selected in the profile.
Message name
Give a name to the message.
Message comment
Enter a comment for the message. The comment is not shown in the user message.
User message main view
Specify the main view (main heading) to be shown on the top of the user message.
User message logo
Specify the logo to be shown in the user messages. Attach the logo to the request as an attachment file.
User message header
Specify a header for the user message information field.
User message information
Specify the contents of the user message.
Example of a user message request
Message type: Block
Message name: Blocked message
Message comment: Antivirus Blocked message
User message main view: Antivirus
User message logo: Attached to the request
User message header: Antivirus Blocked
User message information: The site you are trying to access is classified as malicious and has been blocked. For more information, please contact your help desk.
8.8 Antivirus user message change request
Specify the user message to be changed and the change to be made.
Example of a change request
Message type: Block
Message name: Blocked message
Message comment: Antivirus Blocked message
User message main view: Antivirus
User message logo: Attached to the request
User message header: Antivirus Blocked
User message information: The site you are trying to access is classified as malicious and has been blocked. For more information, please contact your help desk.
Change to be made: Change the contents of the user message to The site you are trying to access is classified as malicious and has been blocked. For more information, please contact your help desk at 0000 9999.
8.9 Antivirus user message deletion request
Specify the user message to be deleted.
Example of a deletion request
Name of the message to be deleted: Blocked message
Return change targets table
9 BOTNET PROTECTION
With a Botnet protection request, you can order new rules, profiles and user messages for the Botnet protection service and changes to the existing ones or their deletion.
Botnet malware allows criminals to manage workstations and servers remotely and to perform unauthorized actions such as steal data, distribute spam and spread malware and to force them to participate in DoS attacks.
This functionality allows botnet-contaminated workstations and servers to be identified and traffic from them to botnet management servers to be prevented. It helps you to minimize damage by preventing for instance the transmission of confidential information from the company's network.
Profile scanning is based on the confidence level and performance settings that are specified by the manufacturer and that can be changed.
Protection settings are specified by the manufacturer.
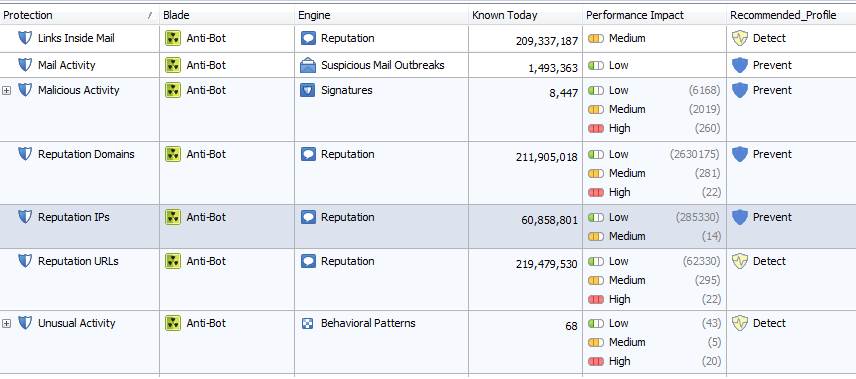
Figure: Botnet protection settings specified by the manufacturer
9.1 Botnet protection rule request
In the following, you will find a picture of a botnet protection rule and descriptions of the settings ordered with a botnet prevention request.
![]()
Figure: Botnet prevention rule
Specifying the rule number (No.)
The rule number specifies the point in the botnet prevention rule base where the rule is read.
Specifying the rule name
Give a name to the rule. The name will remain unchanged in the rule base. The name can include up to 30 characters.
Definition of the protected scope
Specify what IP addresses, IP networks or users are scanned (Any refers to all).
Profile to be used (Action)
Specify the profile to be used in the rule. Instructions on how to specify the profile here.
Tracking the rule
Specify whether the rule is to be tracked or not.
Specifying a Comment
The comment is a free text attached to a rule.
Sending a request for implementation
When you have made the specifications, select Send request or, to add new changes, select Add change. When all the necessary specifications have been made, press Send request, and the request is submitted to Telia for implementation.
Example of a rule request
Rule number: 1
Rule name: Botnet scan
Protected scope: Any (scans all traffic)
Scan profile: Recommended_Profile
Track: Yes
Comment: Anti-virus scan of the organization
9.2 Botnet protection rule change request
Specify the rule to be changed and the change to be made.
Example of a change request
Rule name: Botnet scan
Protected scope: Any (scans all traffic)
Scan profile: Recommended_Profile
Track: Yes
Comment: Anti-virus scan of the organization
Change to be made: Change the protected scope to the network intra_10.10.10.0m0
9.3 Botnet protection rule deletion request
Specify the rule to be deleted.
Example of a deletion request
Rule to be deleted: Number 1
Name of the rule to be deleted (obligatory information): Botnet scan
9.4 Botnet protection profile request
In the following, you will find a picture of a profile scan activated when the service is introduced and descriptions of the settings that can be made in the fields.
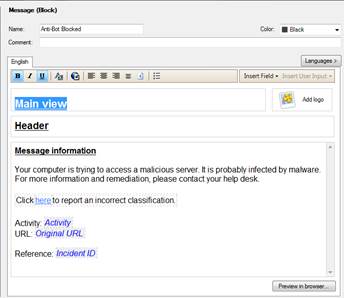
Figure: Profile settings
NB: The botnet prevention profile can be identical with the antivirus and Advanced Threat Protection profile.
Specifying the profile name (Name)
Specify the profile name. The name can include up to 60 characters.
Specifying a Comment
Specify a comment for the profile. The comment can include up to 80 characters.
Specifying high-confidence actions
The confidence level determines how likely the detected bot command channel is actually a command channel. Specify the actions to be taken with high-confidence traffic. The options are: Prevent, Detect, Ask or Inactive. The user message sent to the user is determined by these definitions. If Prevent is selected, a Block message is sent, and if Ask is selected, an Ask message is sent. The user message specifying here.
Specifying medium-confidence actions
Specify what actions are to be taken with medium-confidence traffic. The options are: Prevent, Detect, Ask or Inactive.
Specifying low-confidence actions
Specify the actions to be taken with low-confidence traffic. The options are: Prevent, Detect, Ask or Inactive.
Performance Impact
Specify the performance level on or below which scanning is performed. The options are: Low, Medium or lower, High or lower.
Example of a profile request
Profile name: Intra_verkon_suojaus
Comment: Profile for protecting the intranet
High-confidence actions: prevent
Medium-confidence actions: prevent
Low-confidence actions: detect
Impact on performance: High or lower
9.5 Botnet protection profile change request
Specify the profile to be changed and the change to be made.
Example of a change request
Profile name: Intra_verkon_suojaus
Comment: Profile for protecting the intranet
High-confidence actions: prevent
Medium-confidence actions: prevent
Low-confidence actions: detect
Impact on performance: High or lower
Change to be made: Change low-confidence actions to: prevent
9.6 Botnet protection profile deletion request
Specify the profile to be deleted.
Example of a deletion request
Profile to be deleted: Intra_verkon_suojaus
9.7 Botnet protection user message request
In the following, you will find a picture of a botnet protection user message (Prevent) and how it is shown in the browser, and also descriptions of the settings that can be made in the fields.
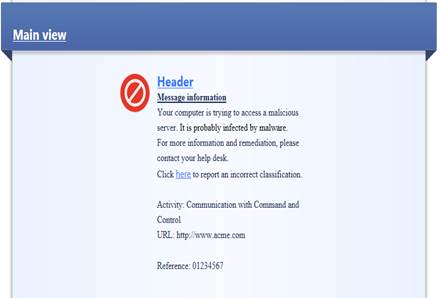
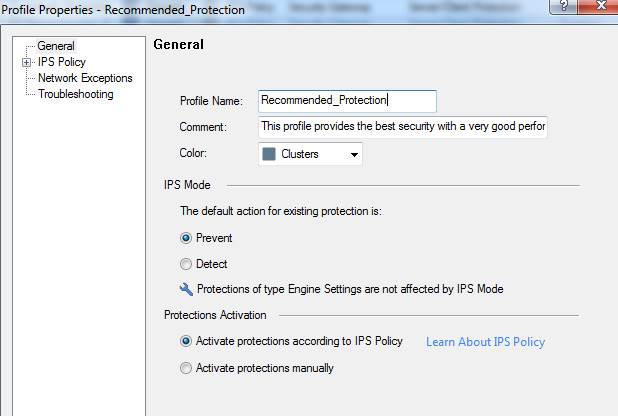
Figure: User message.
Message type (Block/Ask)
The message can be a block or an ask message. A block message is sent if the setting Prevent is selected in the profile. An ask message is sent if the setting Ask is selected in the profile.
Message name
Give a name to the message.
Message comment
Specify a comment for the message. The comment is not shown in the user message.
User message main view
Specify the main view (main heading) to be shown on top of the user message.
User message logo
Specify the logo to be shown in the user messages. Attach the logo to the request as an attachment file.
User message header
Specify a header for the user message information field.
User message information
Specify the contents of the user message.
Example of a user message request
Message name: Blocked message
Message comment: Botnet Blocked message
User message main view: Botnet
User message logo: Attached to the request
User message header: Botnet Blocked
User message information: Your computer is trying to access a malicious server. It is probably infected by malware. For more information and remediation, please contact your helpdesk.
9.8 Botnet protection user message change request
Specify the user message to be changed and the change to be made.
Example of a change request
Message name: Blocked message
Message comment: Antivirus Blocked message
User message main view: Botnet
User message logo: Attached to the request
User message header: Antivirus Blocked
User message information: The site you are trying to access is classified as malicious and has been blocked. For more information, please contact your help desk.
Change to be made: Change the contents of the user message to The site you are trying to access is classified as malicious and has been blocked. For more information, please contact your helpdesk at: 0000 9999.
9.9
Botnet
protection user message deletion request
Specify the user message to be deleted.
Example of a deletion request
Name of the message to be deleted: Blocked message
Return change targets table
10 INTRUSION PREVENTION
With an intrusion prevention request, you can order new scan profiles, changes to existing scan profiles and their deletion and specify networks, protocols or identifiers not to be scanned.
The intrusion prevention functionality allows the information security device to detect any intrusion and attack attempts in the connections passing through it.
The intrusion prevention functionality detects, for example, network worms, Trojans, applications sending usage data without authorization (spyware), and targeted attacks towards vulnerable applications.
10.1 Intrusion prevention profile request
In the following, you will find a picture of a profile scan activated when the service is introduced and descriptions of the settings that can be made in the fields.
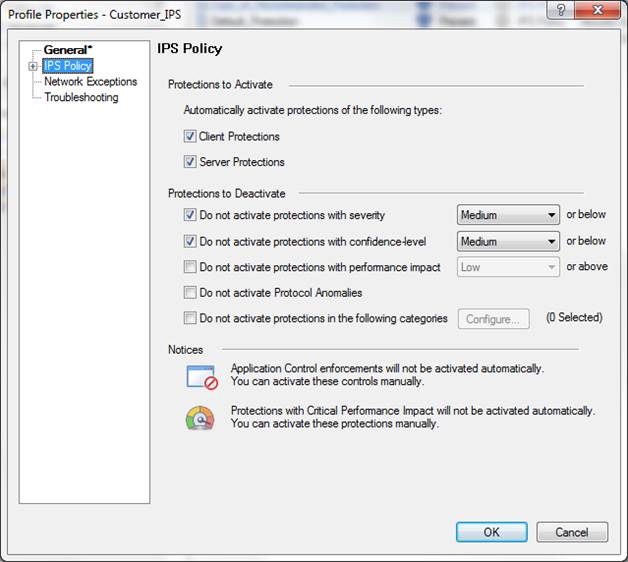

Figure: Intrusion prevention profile scans
Specifying the profile name
Specify the profile name. The name can include up to 60 characters.
Specifying a Comment
Specify a comment for the profile. The comment can include up to 80 characters.
Specifying the IPS settings (IPS Mode)
Specify whether intrusion/attack attempt traffic is to be prevented or detected.
Specifying the IPS policy:
Protections to activate
Specify whether scanning is activated for clients and servers.
Protections to deactivate:
Do not activate protections with severity
Specify the severity level below which scanning is not performed. The severity levels have been specified by the manufacturer. The available options are: low, medium, high, critical.
Do not activate protections with confidence level
Specify the confidence level below which scanning is not performed. The severity levels have been specified by the manufacturer. The available options are: low, medium-low, medium, medium-high, high.
Do not activate protections with performance impact
Specify the performance level above which scanning is not performed. The severity levels have been specified by the manufacturer. The available options are: very-low, low, medium, high.
Example of an IPS profile request
Profile name: Intra_verkon_suojaus
Comment: Profile for protecting the intranet
Specifying the IPS settings: Preventing traffic if an intrusion attempt is detected
Specifying the protection settings: Activating protection for clients and servers
Specifying severity-level-based scanning: Scanning is not performed below the severity level low
Specifying confidence-level-based scanning: Scanning is not performed below the confidence level low
Specifying performance-level-based scanning: Scanning is not performed above the performance level high
10.2 Intrusion prevention profile change request
Specify the profile to be changed and the change to be made.
Example of a change request
Profile name: Intra_verkon_suojaus
Comment: Profile for protecting the intranet
Specifying the IPS settings: Preventing traffic if an intrusion attempt is detected
Specifying the protection settings: Activating protection for clients and servers
Specifying severity-level-based scanning: Scanning is not performed below the severity level low
Specifying confidence-level-based scanning: Scanning is not performed below the confidence level low
Specifying performance-level-based scanning: Scanning is not performed above the performance level high
Change to be made: Change the specification of severity-level-based scanning: Scanning is not performed below the level medium
10.3 Intrusion prevention profile deletion request
Specify the profile to be deleted.
Example of a deletion request
Profile to be deleted: Intra_verkon_suojaus
Return change targets table
11 USER AWARENESS
With a user awareness request, you can order changes to the IP addresses of the domain controllers, to the domain name or to the user ID (username, password) of the service account.
The functionality enables users, user groups and devices to be identified, access to be restricted, and the information security policy to be implemented based on the identity and user group. The introduction of the functionality requires integration of the system with the customers user directory. The customer is responsible for the maintenance and management of the user directory.
If the request relates to the user identification functionality, our specialist will contact you before the delivery, if necessary.
Example of a change to be made to the user identification functionality:
Changing the Secondary AD's IP address 10.10.10.10 to 10.10.10.11. The Domain Admin password remains unchanged.
Return change targets table
12 ADVANCED THREAT PROTECTION
The Advanced Threat Protection service monitors how a file behaves in a workstation environment and strives to prevent unknown malware from entering the customer network.
With an Advanced Threat Protection request, you can order new rules, profiles and user messages for the Advanced Threat Protection service and changes to the existing ones or their deletion.
Profile scanning is based on the confidence level and performance settings that are specified by the manufacturer and that can be changed.
The protection settings are specified by the manufacturer.
![]()
Figure. Protection settings of Advanced Threat Protection as specified by the manufacturer.
12.1 Advanced Threat Protection rule request
In the following, you will find a picture of an Advanced Threat Protection rule and descriptions of the settings ordered with an Advanced Threat Protection request.
![]()
Figure .Advanced Threat Protection rule
Specifying the rule number (No.)
The rule number specifies the point in the Advanced Threat Protection rule base where the rule is read.
Specifying the rule name
Give a name to the rule. The name will remain unchanged in the rule base. The name can include up to 30 characters.
Definition of the protected scope
Specify what IP addresses, IP networks or users are scanned (Any refers to all).
Profile to be used (Action)
Specify the profile to be used in the rule. You can find instructions for specifying the profile here.
Tracking the rule
Specify whether the rule is to be tracked or not.
Specifying a comment
The comment is a free text attached to a rule.
Sending a request for implementation
When you have made the specifications, select Send request or, to add new changes, select Add change. When all the necessary specifications have been made, press Send request, and the request is submitted to Telia for implementation.
Example of a rule request
Rule number: 1
Rule name: Advanced Threat Protection scan
Protected scope: Any (scans all traffic)
Scan profile: Recommended_Profile
Track: Yes
Comment: Advanced Threat Protection scan of the organization
12.2 Advanced Threat Protection rule change request
Specify the rule to be changed and the change to be made.
Example of a change request
Rule name: Advanced Threat Protection scan
Protected scope: Any (scans all traffic)
Scan profile: Recommended_Profile
Track: Yes
Comment: Advanced Threat Protection scan of the organization
Change to be made: Change the protected scope to the network intra_10.10.10.0m0
12.3 Advanced Threat Protection rule deletion request
Specify the rule to be deleted.
Example of a deletion request:
Rule to be deleted: Number 1
Name of the rule to be deleted (obligatory information): Advanced Threat Protection scan
12.4 Advanced Threat Protection profile request
In the following, you will find a picture of a profile scan activated when the service is introduced and descriptions of the settings that can be made in the fields.

Figure. Profile settings
NB: The antivirus, botnet prevention and Advanced Threat Protection profiles can be identical.
Specifying the rule name
Specify the profile name. The name can include up to 60 characters.
Specifying a comment
Specify a comment for the profile. The comment can include up to 80 characters.
Specifying high-confidence actions
The confidence level determines how likely the detected threat is actually a threat. Specify the actions to be taken with high-confidence traffic. The options are: Prevent, Detect, Ask or Inactive. The user message sent to the user is determined by these definitions. If Prevent is selected, a Block message is sent, and if Ask is selected, an Ask message is sent. You can find instructions for specifying a user message here.
Specifying medium-confidence actions
Specify what actions are to be taken with medium-confidence traffic. The options are: Prevent, Detect, Ask or Inactive.
Specifying low-confidence actions
Specify the actions to be taken with low-confidence traffic. The options are: Prevent, Detect, Ask or Inactive.
Performance Impact
Specify the performance level on or below which scanning is performed. The options are: Low, Medium or lower, High or lower.
Example of a profile request
Profile name: Intra_verkon_suojaus
Comment: Profile for protecting the intranet
High-confidence actions: prevent
Medium-confidence actions: prevent
Low-confidence actions: detect
Impact on performance: High or lower
12.5 Advanced Threat Protection profile change request
Specify the profile to be changed and the change to be made.
Example of a change request
Profile name: Intra_verkon_suojaus
Comment: Profile for protecting the intranet
High-confidence actions: prevent
Medium-confidence actions: prevent
Low-confidence actions: detect
Impact on performance: High or lower
Change to be made: Change low-confidence actions to: prevent
12.6 Advanced Threat Protection profile deletion request
Specify the profile to be deleted.
Example of a deletion request:
Profile to be deleted: Intra_verkon_suojaus
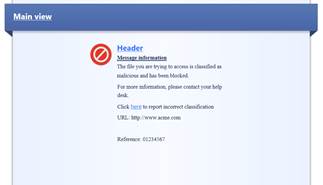
12.7 Advanced Threat Protection user message request
In the following, there are pictures of an Advanced Threat Protection user message (Prevent) and how it is shown in the browser, and descriptions of the settings that can be made in the fields.

Figure
User message
Message type (Block/Ask)
The message can be a block or an ask message. A block message is sent if the setting Prevent is selected in the profile. An ask message is sent if the setting Ask is selected in the profile.
Message name
Give a name to the message.
Message comment
Specify a comment for the message. The comment is not shown in the user message.
User message main view
Specify the main view (main heading) to be shown on top of the user message.
User message logo
Specify the logo to be shown in the user messages. Attach the logo to the request as an attachment file.
User message header
Specify a header for the user message information field.
User message information
Specify the contents of the user message.
Example of a user message request
Message name: Blocked message
Message comment: Threat Emulation Blocked message
User message main view: Threat Emulation
User message logo: Attached to the request
User message header: Threat Emulation Blocked
User message information: The file you are trying to access is classified as malicious and has been blocked. For more information, please contact your help desk.
12.8 Advanced Threat Protection user message change request
Specify the user message to be changed and the change to be made.
Example of a change request
Message name: Blocked message
Message comment: Threat Emulation Blocked message
User message main view: Threat Emulation
User message logo: Attached to the request
User message header: Threat Emulation Blocked
User message information: The site you are trying to access is classified as malicious and has been blocked. For more information, please contact your help desk.
Change to be made: Change the contents of the user message to The site you are trying to access is classified as malicious and has been blocked. For more information, please contact your help desk at: 0000 9999
12.9 Advanced Threat Protection user message deletion
request
Specify the user message to be deleted.
Example of a deletion request:
Name of the message to be deleted: Blocked message
Return change targets table
13 ACCESS RIGHT REQUEST
With an access right request, you can order SurfManager users access to the security device tools, which makes possible to check rules and log information.
The information required includes the username, the public IP address from which the connections are set up. Password and mobile number for SMS authentication are same as SurfManager user ID.
You should see to it that the firewall openings in your own firewall are in order and submit a separate change request on any firewall openings (firewall rule change).
We recommend that the same NAT address is always used for all client users. NB: If the NAT address is changed, you should submit an access right change request and disclose the new NAT address in it.
When you have received the access rights, you can download the client from Partnergates website, where you can also find instructions on how to use the client. You can check client software version from SurfManager connection view Access rights(Version).
Example of an access right change:
A user ID for the client is created for the user abc12345. The users IP address is 1.1.1.1.
Return change targets table
14 EXPERT WORK
With a expert work request, you can order remote specialist work related to the service.
The deliverability and schedule of the work is confirmed separately. Examples of expert work include firewall-related reports, data collection, and requests for information.
Example of specialist work
Find out which rules have not been used during the past two months. These rules should be disabled and deleted after approval.
Return change targets table
15 Standby
With a stand-by/on-call request, you can order a member of the production personnel to be on stand-by or on call.
Stand-by means that a specialist is reserved for a certain time in case a specialist is needed to make firewall openings during a network change.
Work performed during stand-by is invoiced for according to specialist work. A stand-by request is to be submitted at least two business days in advance. Telia confirms stand-by separately and gives the specialists contact details. The specialist is ready to start work with a maximum delay of one hour. In the service request field, you should enter the dates and times when stand-by is required and the reason for stand-by.
Example of a stand-by request
We need a specialist to monitor traffic from the address 10.10.10.10 to the address 10.1.1.1 and to find out which ports are used for this traffic. The traffic monitoring will take place on Friday this week, between 10 and 11 am.
Return change targets table
16 REPORTING AND LOGS
With a reporting request, you can order more detailed reports on the traffic that has passed through the firewall. With a reporting request, it is also possible to request changes to the settings of existing reporting, such as the reporting interval.
Reports give the customer more detailed information on the traffic that has passed through, or that has been blocked by, the firewall.
Example of a reporting request
Provide a report on traffic to the address 10.10.10.10 during the past week.
Return change targets table
17 OTHER CONFIGURATION CHANGE
With other configuration change, you can order small changes to the information security device, such as changes to its interface settings.
Return change targets table